
| 일 | 월 | 화 | 수 | 목 | 금 | 토 |
|---|---|---|---|---|---|---|
| 1 | 2 | 3 | 4 | 5 | ||
| 6 | 7 | 8 | 9 | 10 | 11 | 12 |
| 13 | 14 | 15 | 16 | 17 | 18 | 19 |
| 20 | 21 | 22 | 23 | 24 | 25 | 26 |
| 27 | 28 | 29 | 30 |
- ubuntu
- macos
- Crawling
- algorithm
- sequelize
- S3
- Kotlin
- React
- typeorm
- DATABASE
- postman
- mongoose
- Android
- OS
- python
- mysql
- docker
- Util
- Express
- Scheduling
- linux
- css
- Network
- TypeScript
- node.js
- OOAD
- MongoDB
- HTML
- AWS
- wireshark
- Today
- Total
SW
[React] vis-network를 이용한 네트워크 토폴로지 그리기 본문
서론
이번 글에서는 오픈소스 라이브러리인 vis-network 라이브러리를 이용하여 네트워크 토폴로지는 그리는 방법에 대해서 알아본다.
vis-network 라이브러리를 이용하면 각 데이터를 표현하는 노드(Node)와 노드 간 연결정보를 표현하는 엣지(Edge)를 화면상에 시각화 할 수 있으며, 모양/스타일/색상/크기 등을 자유롭게 커스터마이징 할 수 있다.
해당 라이브러리에 대한 자세한 내용은 아래 공식 문서를 참고하길 바란다.
vis.js - Network documentation.
Returns: Array Nodes can be in clusters. Clusters can also be in clusters. This function returns an array of nodeIds showing where the node is. If any nodeId in the chain, especially the first passed in as a parameter, is not present in the current nodes l
visjs.github.io
본론
먼저 라이브러리를 사용하기 위해 패키지를 설치한다.
npm install vis-network --save
패키지 설치가 완료되면 다음과 같이 예제 코드를 작성해보자.
App.js
import React, {useEffect, useRef} from 'react';
import { Network } from "vis-network";
function App() {
const container = useRef(null);
const nodes = [
{id: 1, label: 'South Korea', size: 20, shape: 'square'},
{id: 2, label: 'Seoul'},
{id: 3, label: 'Jeju'},
{id: 4, label: 'Busan'},
{id: 5, label: 'Incheon'},
]
const edges = [
{ from: 2, to: 1, label: 'label1'},
{ from: 3, to: 1, label: 'label2'},
{ from: 4, to: 1, label: 'label3'},
{ from: 5, to: 1, label: 'label4'},
];
// network topology options.
const options = {
nodes: {
shape: "dot",
size: 12,
shadow: true,
color: {
border: 'white',
background: 'skyblue'
},
font: {
color: '#000'
}
},
edges: {
color: 'gray'
},
interaction: {
hover: true
}
};
// create topology using edges, nodes, options
useEffect(() => {
const network = container.current && new Network(container.current, { nodes, edges }, options);
// Use `network` here to configure events, etc
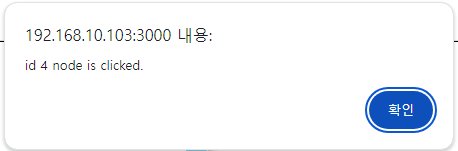
network.on("doubleClick", (event) => {
const { nodes: clickedNodes } = event;
alert(`id ${clickedNodes} node is clicked.`);
});
}, [container, nodes, edges]);
return (
<div>
<div ref={container} style={{ height: "500px", width: "100%" }} />
</div>
);
}
export default App;
- 노드의 값으로는 노드ID(id), 노드명(label) 등을 포함한 다양한 옵션이 들어갈 수 있다.
- 엣지의 값으로는 출발노드(from), 도착노드(to)를 명시하여 연결 관계를 정의할 수 있다.
위 코드를 실행한 결과는 다음과 같다.
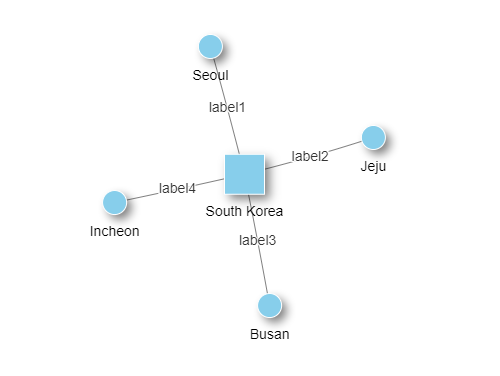
- 기존 options 변수에서 노드의 스타일을 점(dot)으로 정의했지만, nodes 변수에 정의된 스타일이 우선순위가 높아 South Korea 노드의 경우에는 사각형(square)으로 나타나는 것을 확인할 수 있다.
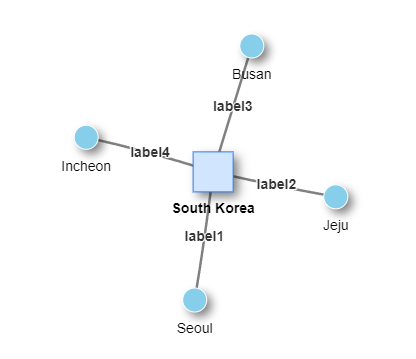
옵션에 interaction: { hover: true } 를 넣어 노드에 hovering 했을 때 해당 노드 및 연결된 엣지가 굵어지는 것을 확인할 수 있다. 이외에도 토폴로지에 사용할 수 있는 옵션은 매우 다양하여 공식 문서를 참고하길 바란다.
또한, network 객체에 doubleClick 이벤트를 추가했으며 노드를 더블클릭 했을 때 나오는 결과는 다음과 같다.
'React' 카테고리의 다른 글
| [React] OpenSSL을 이용한 HTTPS 환경 구축하기 (0) | 2024.04.12 |
|---|---|
| [React] zsh: command not found: yarn 에러 해결하기 (0) | 2022.07.23 |
| [React] react-router-dom v6을 이용한 라우팅 기능 구현하기 (0) | 2022.07.23 |
| Next.js란? 간단하게 세팅하기 (0) | 2022.05.07 |
| [React] Styled Components 사용하기 (0) | 2022.05.07 |


