
| 일 | 월 | 화 | 수 | 목 | 금 | 토 |
|---|---|---|---|---|---|---|
| 1 | ||||||
| 2 | 3 | 4 | 5 | 6 | 7 | 8 |
| 9 | 10 | 11 | 12 | 13 | 14 | 15 |
| 16 | 17 | 18 | 19 | 20 | 21 | 22 |
| 23 | 24 | 25 | 26 | 27 | 28 |
- postman
- css
- Kotlin
- S3
- TypeScript
- ubuntu
- linux
- OS
- mongoose
- React
- MongoDB
- Android
- algorithm
- python
- Crawling
- wireshark
- AWS
- sequelize
- OOAD
- mysql
- Express
- Network
- DATABASE
- node.js
- Scheduling
- HTML
- macos
- typeorm
- docker
- Util
- Today
- Total
Seongwon Lim
[node.js] Typescript + TypeORM + Express를 이용하여 서버 구성하기 본문
서론
이번 포스팅 글에서는 Express 환경에서 타입스크립트를 이용하여 서버를 구축하고, 타입스크립트에서 사용할 수 있는 ORM인 TypeORM을 이용하여 관계형 데이터베이스를 구축하는 예제를 살펴보고자 한다.
개발환경 구성하기
- npm install typeorm -g 명령어를 통해 typeorm을 설치한다.
다음으로 typeorm init --name typeorm-example --database mysql 명령어로 typeorm을 기반으로 하는 환경을 초기화한다.위와 같이 입력하면 typeorm-exmaple 이름의 디렉토리가 생성되며 데이터베이스 종류는 Mysql로 지정한다는 의미이다.
디렉토리 구조는 다음과 같다.
typeorm-example
├── src
│   ├── entity
│   │   └── User.ts
│   ├── migration
│   └── index.ts
├── node_modules
├── ormconfig.js
├── package-lock.json
├── package.json
├── README.md
├── .gitignore
└── tsconfig.json
다음으로는 서버 구성에 필요한 모듈을 설치한다.
필자는 express, typescript, ts-node, @types/node, @types/express 5개의 개발에 필요한 모듈을 설치했다.
- npm install express typescript ts-node @types/node @types/express --save
package.json 파일 구조는 다음과 같다.
{
   "name": "typeorm-example",
   "version": "0.0.1",
   "description": "Awesome project developed with TypeORM.",
   "type": "commonjs",
   "devDependencies": {
      "@types/node": "^16.11.26",
      "ts-node": "^10.4.0",=
      "typescript": "^4.5.2"
   },
   "dependencies": {
      "@types/express": "^4.17.13",
      "express": "^4.17.3",
      "mysql": "^2.14.1",
      "reflect-metadata": "^0.1.13",
      "typeorm": "0.2.45"
   },
   "scripts": {
      "start": "ts-node src/index.ts",
      "typeorm": "node --require ts-node/register ./node_modules/typeorm/cli.js"
   }
}
이제 공식문서를 참조하여 파일을 수정해보고자 한다.
- 여기를 참조하면 공식 문서 사이트로 이동할 수 있다.
tsconfig.json 파일 수정하기
"emitDecoratorMetadata": true,
"experimentalDecorators": true,
위의 두 개 옵션이 tsconfig.json 파일에 존재하지 않는 경우 두 개의 옵션을 compilerOptions안에 추가한다.
다음으로 "esModuleInterop": true 옵션을 추가한다. 해당 옵션을 true로 주면 ES6 모듈 사양을 준수하여 CommonJS 모듈을 가져올 수 있게 된다.
- esModuleInterop 옵션을 추가하지 않으면 index.ts 파일에서 import express를 했을 때 오류가 발생한다.
ormconfig.json 파일 수정하기
{
   "type": "mysql",
   "host": "localhost",
   "port": 3306,
   "username": "test",
   "password": "test",
   "database": "test",
   "synchronize": true,
   "logging": false,
   "entities": [
      "src/entity/**/*.ts"
   ],
   "migrations": [
      "src/migration/**/*.ts"
   ],
   "subscribers": [
      "src/subscriber/**/*.ts"
   ],
   "cli": {
      "entitiesDir": "src/entity",
      "migrationsDir": "src/migration",
      "subscribersDir": "src/subscriber"
   }
}
초기 ormconfig.json 파일의 상태는 위와 같다. 해당 파일에서 각 옵션들을 사용자가 로컬에서 사용하는 값에 맞게 수정한다.
필자의 경우 username: "root", password: 내 비밀번호, database: "typeexam"으로 설정했다.
데이터베이스 생성하기
typeexam 이라는 데이터베이스를 사용하기 위해서는 해당 데이터베이스가 미리 존재해야 한다.
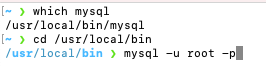
필자는 터미널을 이용해서 직접 mysql에 접속하였다. 그리고 다음과 같이 데이터베이스를 생성했다.

src/entity/User.ts 파일 살펴보기
import {Entity, PrimaryGeneratedColumn, Column} from "typeorm";

@Entity()
export class User {

    @PrimaryGeneratedColumn()
    id: number;

    @Column()
    firstName: string;

    @Column()
    lastName: string;

    @Column()
    age: number;

}
해당 파일의 초기 구성은 위와 같다. 코드를 살펴보면 엔터티명은 User로 정의했고, 총 4개의 속성과 해당 속성들에 대한 속성값을 정의한 것을 확인할 수 있다.
각 컬럼에 다양한 조건을 추가할 수 있으나 해당 글에서는 간단하게 데이터베이스를 매핑하는 예제를 살펴보기 위하여 생략하기로 했다.
src/index.ts 파일 수정하기
import "reflect-metadata";
import {createConnection} from "typeorm";
import {User} from "./entity/User";

createConnection().then(async connection => {

    console.log("Inserting a new user into the database...");
    const user = new User();
    user.firstName = "Timber";
    user.lastName = "Saw";
    user.age = 25;
    await connection.manager.save(user);
    console.log("Saved a new user with id: " + user.id);

    console.log("Loading users from the database...");
    const users = await connection.manager.find(User);
    console.log("Loaded users: ", users);

    console.log("Here you can setup and run express/koa/any other framework.");

}).catch(error => console.log(error));
초기 코드는 위와 같다. 필자는 Express 환경에서 ORM을 이용하여 데이터베이스 연동 및 데이터를 생성하기 위해 다음과 같이 코드를 수정했다.
import "reflect-metadata";
import {createConnection} from "typeorm";
import {User} from "./entity/User";

import express, { Request, Response, NextFunction } from 'express';

const app = express();

app.get('/', (req: Request, res: Response, next: NextFunction) => {
    res.send('Hello Express with Typescript!');
});

app.listen(3000, () => {
    console.log('Starting Server with 3000 port');

    createConnection().then(async connection => {

        const user = new User();
        user.firstName = "Timber";
        user.lastName = "Saw";
        user.age = 25;
        await connection.manager.save(user);
        console.log("Saved a new user with id: " + user.id);

    }).catch(error => console.log(error));

});
Express 환경으로 서버가 실행되면 listen()을 호출하기 때문에 해당 함수에서 데이터베이스가 연동되도록 설정했다. 또한, 데이터베이스 연결과 동시에 User라는 테이블에 데이터를 추가했다.
이제 npm start 명령어를 통해 서버를 실행시켜보자.

서버가 실행됨과 동시에 테이블이 생성되었고, 한 개의 인스턴스가 추가된 것을 확인할 수 있다.
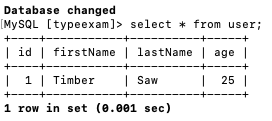
그리고 해당 데이터베이스에 접속하여 조회 쿼리를 해보면 데이터가 적절하게 추가된 것을 확인할 수 있다.
GET 요청으로 데이터 가져오기
app.get() 요청을 이용해서 User 테이블에 저장된 데이터를 조회해보고자 한다.
먼저 User.ts 파일을 다음과 같이 수정한다.
import {Entity, PrimaryGeneratedColumn, Column, BaseEntity} from "typeorm";

@Entity()
export class User extends BaseEntity{

    @PrimaryGeneratedColumn()
    id: number;

    @Column()
    firstName: string;

    @Column()
    lastName: string;

    @Column()
    age: number;

}
BaseEntity 를 상속하면 CRUD에 관련된 save, remove, find, findOne등과 같은 다양한 메서드를 사용할 수 있다.
그리고 index.ts 파일의 app.get() 부분을 다음과 같이 수정한다.
app.get('/', async (req: Request, res: Response, next: NextFunction) => {
    const users = await User.find();
    res.send(users);
});
find() 메서드를 사용하여 User테이블의 모든 데이터를 조회하는 로직을 작성했다.
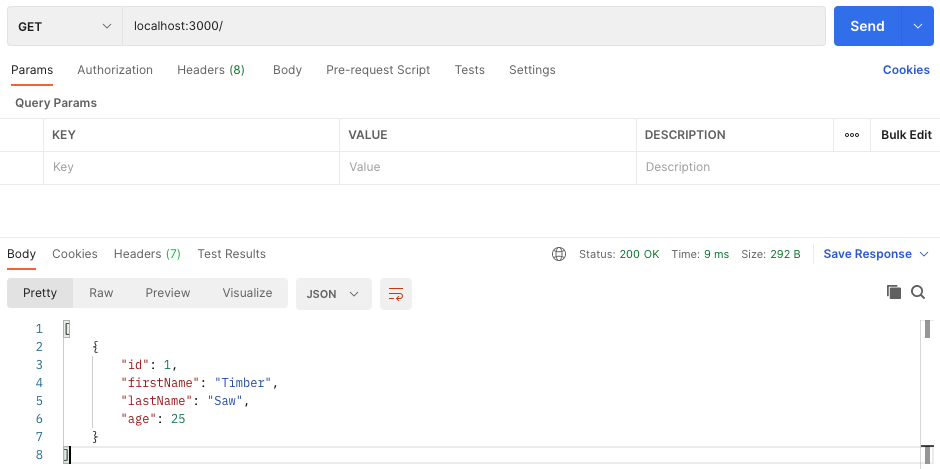
포스트맨으로 localhost:3000 경로에 GET 요청을 보내면 다음과 같이 User테이블에 저장된 데이터가 적절하게 출력되는 것을 확인할 수 있다.
const users = await User.find({
        firstName: 'Timber'
    });
처럼 인자 안에 조건을 추가하여 필터링 된 데이터를 가져올 수도 있다.
출처
'Node.js' 카테고리의 다른 글
| [node.js] Typescript에서 Bcrypt를 이용한 비밀번호 암호화 (0) | 2022.05.08 |
|---|---|
| [node.js] 타입스크립트 파일을 컴파일 후 자바스크립트로 실행하기 (0) | 2022.05.08 |
| [node.js] Typescript 기반 라우터 적용하는 법 (0) | 2022.05.08 |
| [node.js] TypeORM CRUD 예시를 통해 이해하기 (0) | 2022.05.07 |
| [node.js] 미들웨어(MiddleWare)란 무엇일까? (0) | 2022.05.07 |


